Your Guide To Smart Living

The Perfect Blink IR Intensity Level For Blink Camera
There are cameras, and then there are settings. Sometimes, for a newbie or not so tech-savvy, setting up a new camera or customizing the settings can take a toll. Interestingly, things work great when we are able to find the right balance. Blink IR intensity is no different.
Contents
What is IR Intensity?
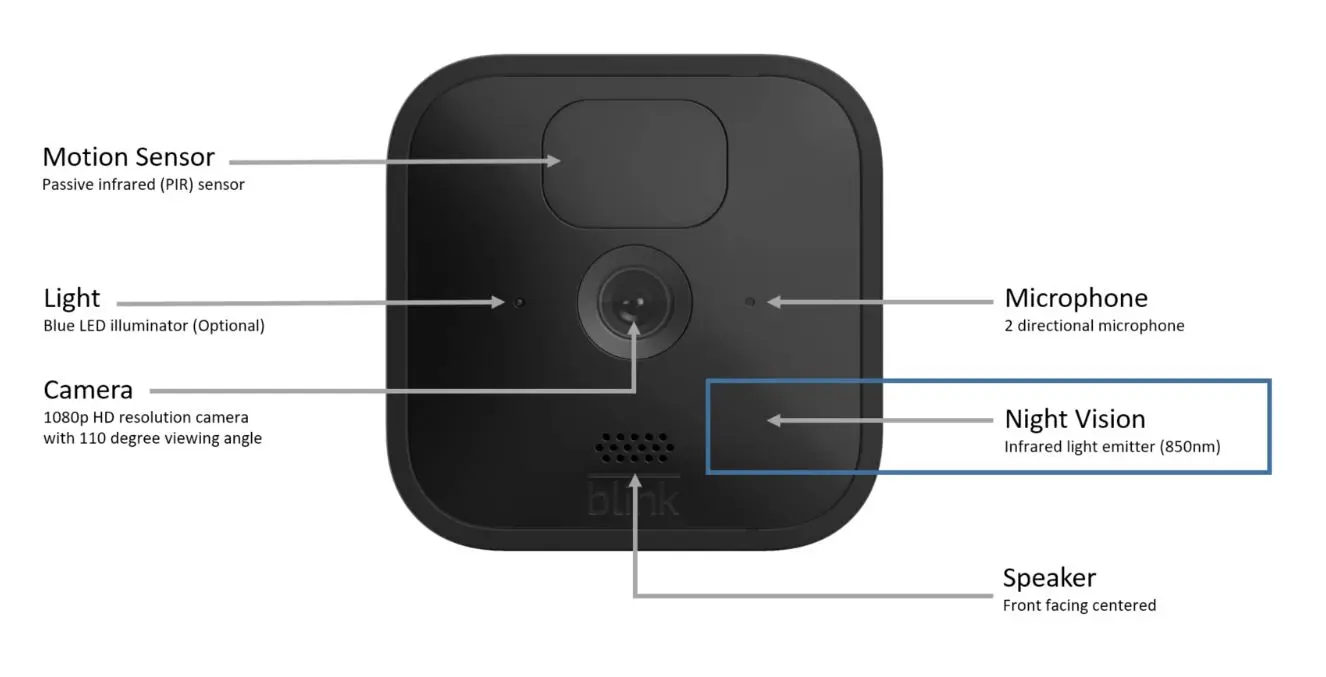
IR intensity stands for the strength of the infrared light emitted by the camera’s built-in infrared LEDs. This infrared light helps to capture clear video footage in low-light or nighttime conditions.
The higher the IR intensity, the better the camera can illuminate its surroundings in the dark, allowing for more effective monitoring and surveillance. IR intensity in smart home security cameras determines how well the camera can “see” and record activities in the dark.
What is IR intensity on Blink Camera?
Blink cameras allow users to set the level of infrared emitted by the camera’s LEDs. This adjustment is helpful because too much IR can cause reflective surfaces to become overexposed, and too little IR can leave the footage too dark to identify subjects.
However, if you have balanced Blink IR intensity settings, your camera will capture usable footage, especially at night.
What Are Blink IR Intensity Levels?
There are 3 Blink IR intensity levels for the Blink camera. It is advised that you set your IR intensity levels to medium level. Smart home security cameras usually use 850nm wavelength LEDs. [Please consult the second table below].
Here’s what 3 levels can do for your surroundings. Choose the settings as per the lighting conditions of your surroundings during the night.
| Intensity Level | If it’s not very dark, but you still want to use Night Vision, go for Low intensity. |
|---|---|
| Low | If it’s not very dark but you still want to use Night Vision, go for Low intensity. |
| Med | Use Medium intensity for most places where you need Night Vision. |
| High | Choose High intensity for really dark areas or places with almost no light. |
If you haven’t set IR Intensity Blink levels before and are not sure whether it works or not, you can use the Live View to test settings.
| Wavelength | Visibility | Consideration |
|---|---|---|
| 850nm | Visible Glow | The emitted light is not visible, but LEDs visibly glow at night. |
| The emitted light is not visible, but LEDs visibly glow at night | ||
| Practical for surveillance settings. | ||
| Allows users to see IR cameras at night. | ||
| 900nm | Invisible | Beyond this point, the glow of LEDs is not visible. |
| and above | Few cameras use 900nm LEDs. | |
| Not visible to the naked eye. | ||
| Mentioned as an option but not deemed necessary in most surveillance environments. |
How To Turn on IR Intensity on Blink Camera
- Tap the More button at the bottom-right corner of the device thumbnail to access Device Settings.
- Select Video and Photo Settings.
- In the Night Vision menu, choose either Auto, On, or Off.
- Tap Save at the top right to retain your selection.
- Tap on IR Intensity and set your IR intensity levels to low, medium, or high.
Conclusion
Blink cameras are great when it comes to recording 24/7. It quite happens, especially during the night when the Blink camera is unable to detect motion. In that case, you can reposition your camera, adjust Motion Settings, and make sure the camera is within range of recording.
If nothing works, you can turn on Blink IR Intensity levels as per the light in your environment. If you still face the issue, you may wanna check your WiFi connection, as just like Ring cameras, Blink cameras also need WiFi.